Chocolate Hazelnut Thumbprint Cookies
Highlighted under: Rustic Sweet Bakes
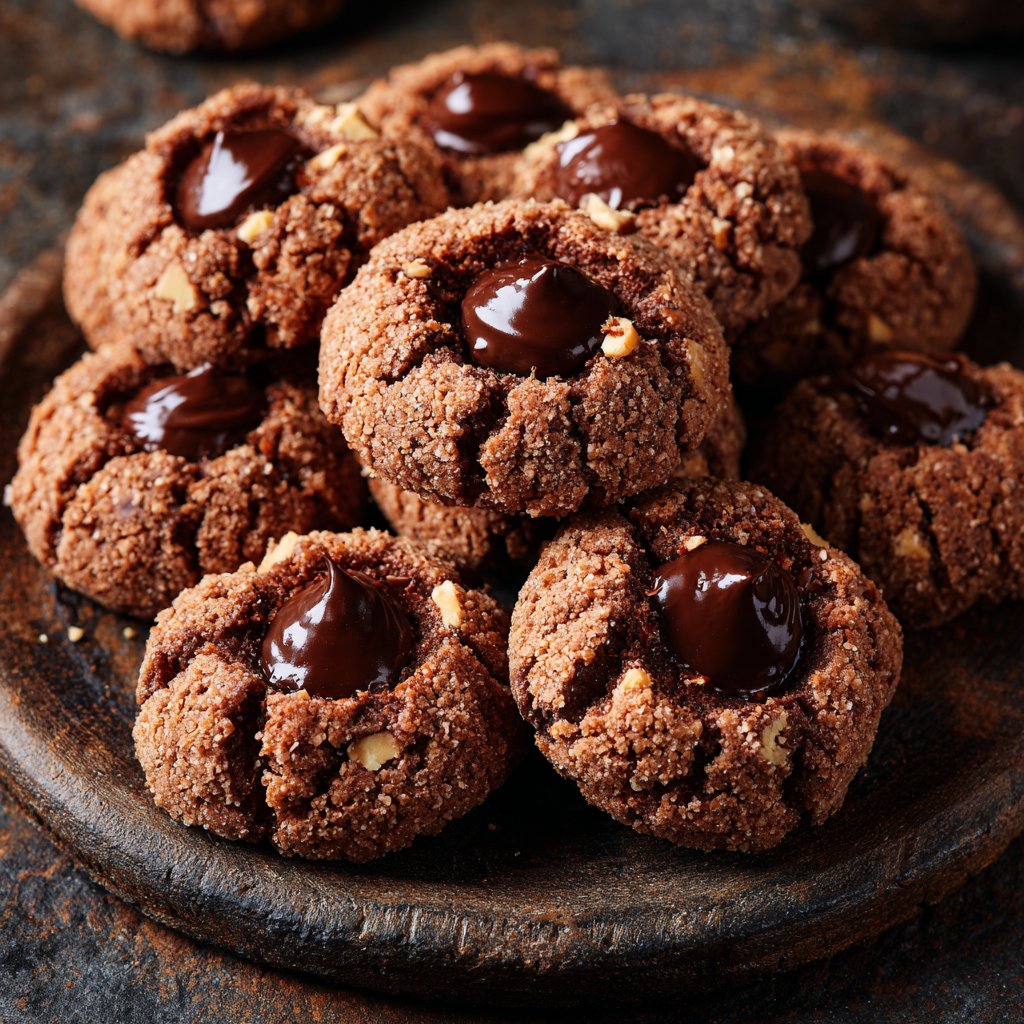
I love indulging in the rich, nutty flavor of Chocolate Hazelnut Thumbprint Cookies. These delightful treats combine the sweetness of chocolate with the crunch of hazelnuts, creating a symphony of flavors in every bite. Making these cookies is such a joyful experience! I particularly enjoy forming the dough balls and making the thumbprints, as it's a simple yet creative process. Baking them fills my kitchen with an irresistible aroma, letting me know that something delicious is on the way. They're perfect for sharing or for enjoying all to myself!
Baking has always been a therapeutic activity for me, and creating these Chocolate Hazelnut Thumbprint Cookies was a delightful way to unwind. When I mixed the dough, I made sure to toast the hazelnuts just right, enhancing their flavor and texture. It’s incredible how a little extra step can elevate the whole cookie experience.
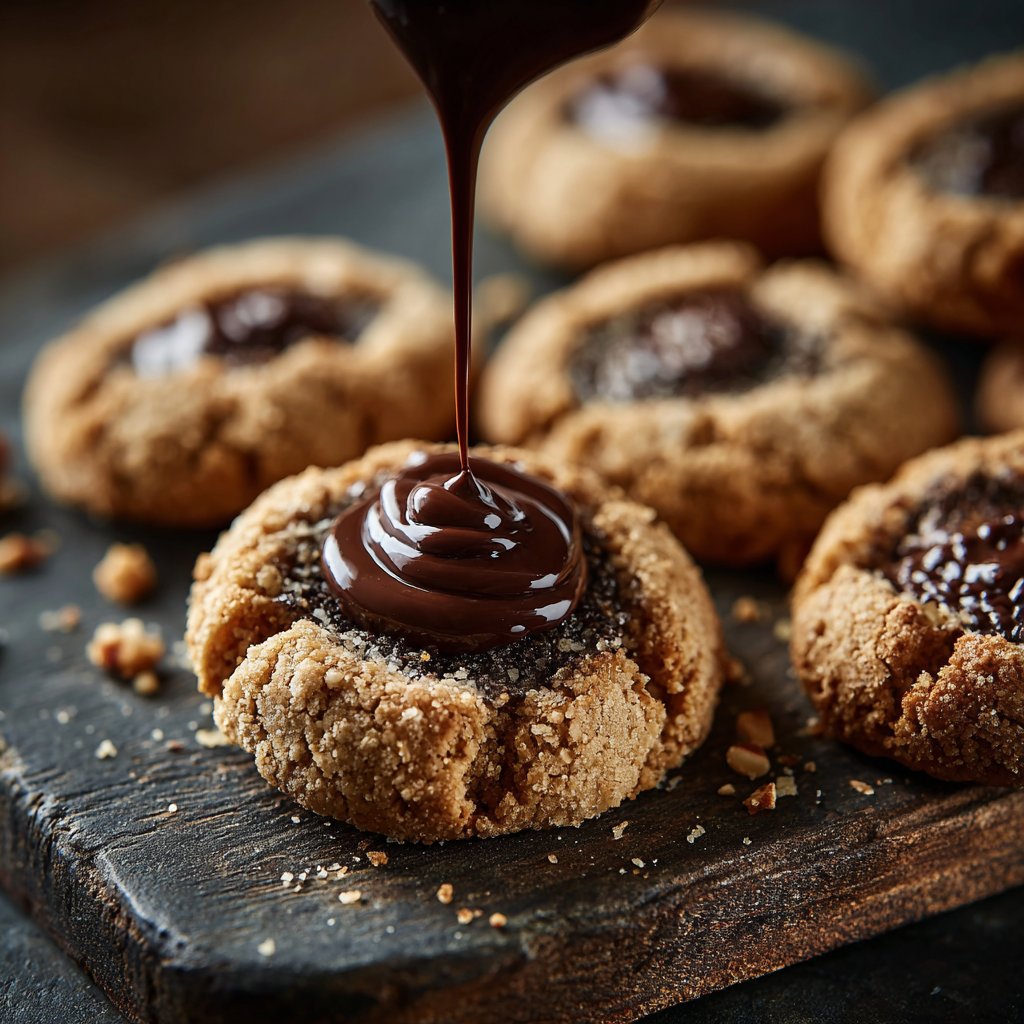
One tip I learned while making these is to let the cookies cool before adding the chocolate filling. This way, the chocolate stays in a perfect dollop, giving the cookies a gorgeous appearance and preventing any melting mishaps. It's those little details that truly make these cookies shine!
Why You'll Love These Cookies
- Rich chocolate flavor paired with nutty hazelnuts
- Deliciously soft texture with a delightful crunch
- Perfect for gifting or enjoying with a cup of coffee
Perfecting the Dough
The base of these Chocolate Hazelnut Thumbprint Cookies lies in the dough itself. Creaming the butter and sugars until light and fluffy is crucial, as it incorporates air into the mixture, resulting in a tender texture. This stage should take about 2-3 minutes on medium speed with an electric mixer. For those who prefer a nutty aroma, toasting the crushed hazelnuts lightly before mixing can enhance their flavor, creating a more robust taste profile in the cookies.
When incorporating the dry ingredients, be sure to sift the flour and cocoa together. Sifting not only removes lumps but also aerates the mixture, contributing to a lighter dough. If you find the dough is too crumbly, a teaspoon of milk or water can improve its consistency without altering the flavor. Likewise, if the dough seems too sticky, a light dusting of flour can help you form the perfect cookie balls.
Baking Tips for Success
Baking time is essential for achieving the right texture. These cookies should be removed from the oven while they still look slightly underbaked; a soft center will solidify as they cool. Look for slightly domed tops and set edges, typically after 12-15 minutes in the oven. If you're using a dark-colored baking sheet, keep an eye on the cookies, as they may bake faster due to increased heat absorbed by the pan.
Creating the thumbprint indentation is an important step that impacts how well they hold the chocolate filling. I find that using a slightly moistened thumb helps in preventing the dough from sticking. Aim for a deep enough indentation to hold a generous amount of chocolate while still keeping the cookie structurally sound when lifted.
Ingredients
Gather the following ingredients to get started on these incredible cookies:
For the Cookies
- 1 cup all-purpose flour
- 1/2 cup unsweetened cocoa powder
- 1/2 cup unsalted butter, softened
- 1/2 cup granulated sugar
- 1/4 cup brown sugar, packed
- 1/2 teaspoon vanilla extract
- 1/2 cup crushed hazelnuts
- A pinch of salt
For the Filling
- 1/2 cup dark chocolate chips
- 1 tablespoon heavy cream
Make sure to measure your ingredients accurately for the best results!
Instructions
Follow these steps to create your delicious Chocolate Hazelnut Thumbprint Cookies:
Preheat the Oven
Preheat your oven to 350°F (175°C) and line a baking sheet with parchment paper.
Mix the Dough
In a bowl, cream together the softened butter, granulated sugar, and brown sugar until light and fluffy. Add the vanilla extract and mix well.
Incorporate Dry Ingredients
Sift together the flour, cocoa powder, and salt. Gradually add to the butter mixture. Stir in the crushed hazelnuts.
Shape and Bake
Form the dough into small balls and place them onto the prepared baking sheet. Use your thumb to create an indentation in each ball. Bake for 12-15 minutes.
Prepare the Filling
While the cookies are baking, melt the chocolate chips with heavy cream in a microwave or over a double boiler until smooth.
Fill the Cookies
Once the cookies have cooled, fill each thumbprint with the melted chocolate mixture.
Allow the cookies to set before serving for the best flavor and texture!
Pro Tips
- For an extra touch, you can sprinkle a pinch of sea salt on top of the chocolate filling before it sets!
Storage and Make-Ahead Options
The Chocolate Hazelnut Thumbprint Cookies can be stored in an airtight container at room temperature for up to a week, maintaining their delightful texture. If you want to make them ahead of time, consider baking the cookies without the filling and storing them separately. The unfilled cookies freeze well for up to three months; just remember to thaw them overnight in the refrigerator before filling them with the chocolate mixture.
If you have leftover melted chocolate filling, it can be stored in the fridge for up to a week. Simply reheat it gently in the microwave or over a double boiler to return it to a pourable state. This ensures that you can whip up a fresh batch of cookies quickly whenever the craving strikes.
Delicious Variations
Feel free to experiment with the filling! While dark chocolate pairs beautifully with hazelnuts, you could swap in white chocolate or even a peanut butter mixture for a different flavor experience. For a lively twist, you might add a dash of espresso powder to the melted chocolate to intensify the chocolate flavor and add depth.
Incorporating spices like cinnamon or a pinch of espresso powder into the dough can elevate these cookies even further, complementing the rich chocolate and nut flavors. Additionally, you could consider replacing half of the granulated sugar with powdered sugar for a different texture. The possibilities to make these cookies uniquely yours are endless!
Questions About Recipes
→ Can I use other nuts instead of hazelnuts?
Yes, you can substitute hazelnuts with walnuts or almonds for different flavors.
→ How should I store the cookies?
Store them in an airtight container at room temperature for up to a week.
→ Can these cookies be frozen?
Absolutely! Freeze the baked cookies in an airtight container for up to three months.
→ What chocolate is best for the filling?
Dark chocolate works best for a rich flavor, but you can use milk chocolate if you prefer a sweeter taste.
Chocolate Hazelnut Thumbprint Cookies
Created by: Tessa Wright
Recipe Type: Rustic Sweet Bakes
Skill Level: Intermediate
Final Quantity: 24 cookies
What You'll Need
For the Cookies
- 1 cup all-purpose flour
- 1/2 cup unsweetened cocoa powder
- 1/2 cup unsalted butter, softened
- 1/2 cup granulated sugar
- 1/4 cup brown sugar, packed
- 1/2 teaspoon vanilla extract
- 1/2 cup crushed hazelnuts
- A pinch of salt
For the Filling
- 1/2 cup dark chocolate chips
- 1 tablespoon heavy cream
How-To Steps
Preheat your oven to 350°F (175°C) and line a baking sheet with parchment paper.
In a bowl, cream together the softened butter, granulated sugar, and brown sugar until light and fluffy. Add the vanilla extract and mix well.
Sift together the flour, cocoa powder, and salt. Gradually add to the butter mixture. Stir in the crushed hazelnuts.
Form the dough into small balls and place them onto the prepared baking sheet. Use your thumb to create an indentation in each ball. Bake for 12-15 minutes.
While the cookies are baking, melt the chocolate chips with heavy cream in a microwave or over a double boiler until smooth.
Once the cookies have cooled, fill each thumbprint with the melted chocolate mixture.
Extra Tips
- For an extra touch, you can sprinkle a pinch of sea salt on top of the chocolate filling before it sets!
Nutritional Breakdown (Per Serving)
- Calories: 380 kcal
- Total Fat: 26g
- Saturated Fat: 15g
- Cholesterol: 195mg
- Sodium: 85mg
- Total Carbohydrates: 32g
- Dietary Fiber: 3g
- Sugars: 24g
- Protein: 6g